How To Create a Ticketing System: Step-By-Step Guide

Picture this: You return from the vacation on a busy Monday morning — you log into your system — only to find hundreds of notifications, customer service requests, angry customer messages, sales drop, and refund requests.
Just because your customer service team was unable to handle customer queries, or prioritize them without you.
A ticketing system is a necessity of any business that offers customer service, support, or pre-sales inquiries.
To make sure something like this doesn’t happen with you, build a ticketing system to:
- Streamline processes
- Prioritize important customers
- Promote leadership and information share
- Help answer queries effectively and faster
Join us in this guide where you will learn and create your own ticketing system. Let’s start!
In This Guide

We rigorously test and research every product that we recommend through HeroThemes. Our review process. We may also earn a commission if you make a purchase through our links.
What Is a Ticketing System?
A ticketing system is a software solution that centralizes customer support requests by converting customer interactions into organized tickets.
It includes features to automate repetitive tasks, track progress, enhance collaboration, decision making and management, and prioritize high-impact tickets — ensuring you are efficient and focusing on what’s important.
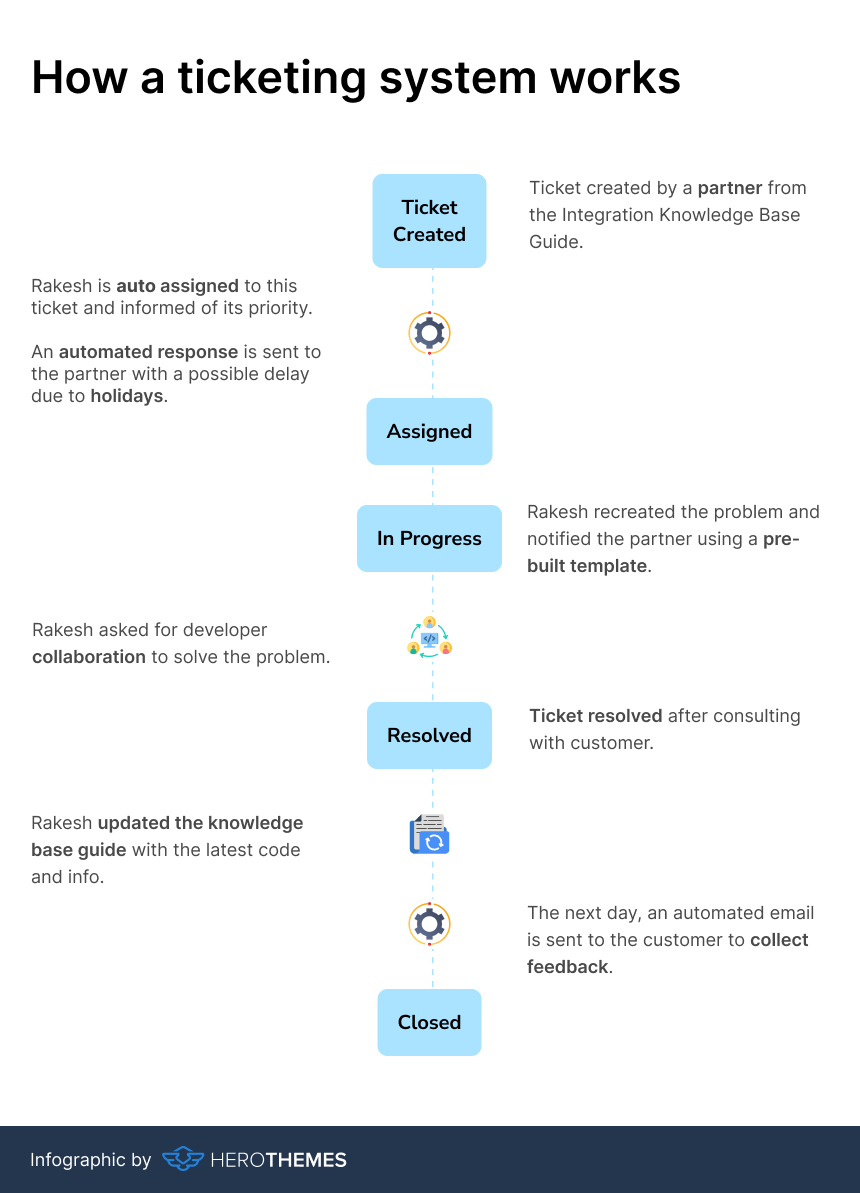
How does a ticketing system work?
Prerequisites and Setup Requirements
You need to prepare a few things before starting with the actual ticketing system setup process.
1. A WordPress Site
WordPress is the most popular CMS (Content Management System) with thousands of plugins to create any kind of website you want.
The ticketing software (Heroic Inbox) we are going to use in this tutorial is a WordPress plugin.
Compared to similar SaaS ticketing software, with WordPress and Heroic Inbox you will save up to 70-90% each year.
Create a WordPress site if you don’t already have one.
The process of creating a WordPress website is pretty simple:
- Purchase a domain name and hosting service
- Connect domain to the hosting service by updating the Nameservers
- Install WordPress through your hosting dashboard / cPanel
- Test out your website
WPBeginner has a very good tutorial on creating a WordPress website. Check it out.
Note: Contact your hosting support team, they will gladly set up WordPress for you.
Furthermore, ensure you have an administrator account on your WordPress site to install necessary plugins.
2. Heroic Inbox: WordPress Helpdesk Plugin
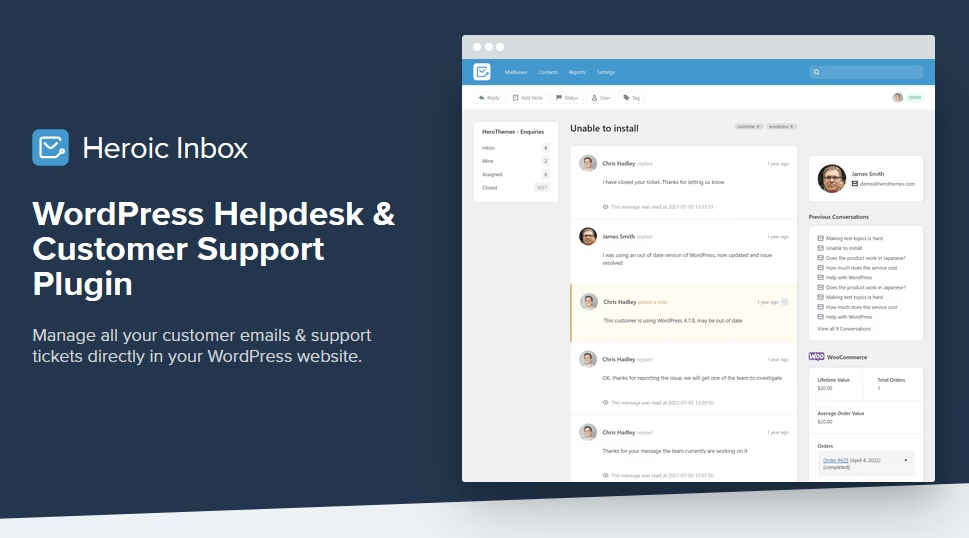
Heroic Inbox is a premium WordPress helpdesk and customer support plugin. It provides you with the necessary features to manage customers emails and tickets through a shared inbox.
Why Heroic Inbox Over Gmail or Outlook?
You are probably using Gmail or Outlook to offer customer service as of right now. No doubt, these are popular email services and you can also use/connect your brand email with these email services.
But they are very limited in terms of team collaboration, group activities, and general follow-up communication. I find Gmail and Outlook only useful for verifying accounts (through OTP), sharing files and sending occasional emails.
Your brain is probably getting fried 🤯 (I had a similar issue) looking at Gmail for 10-15 minutes and wondering what I have to do here.
That’s where tools like Heroic Inbox ☀️ shine. It provides:
- A clean interface
- More focus on priority tasks
- Helps with drafting effective reply
- Share workload with the team members and track progress
Key Features:
- Unified Inbox: Collaborate with multiple team members through a single unified inbox
- Multiple Inboxes: Manage all your company emails like support@, sales@, or any other team emails in one place.
- Team Collaboration: Create team notes, draft replies, assign tickets, update status, and do internal discussions.
- Automation Tools: Save replies, auto-responders, collision detection (stops scheduled message from sending when an incoming message detected), and ticket history tracking.
- Customer Insights: Get customer profiles and previous interactions alongside tickets.
Heroic Inbox plans start at $199.50/year. This includes all the essential features to get you started, and no limits on users and tickets.
Step-By-Step Guide To Creating the Ticketing System
Once you are done with the prerequisites, it’s time to start with the actual ticketing system setup process.
Step 1: Install and Activate Heroic Inbox Helpdesk Plugin
Download the Heroic Inbox plugin from your account downloads section.
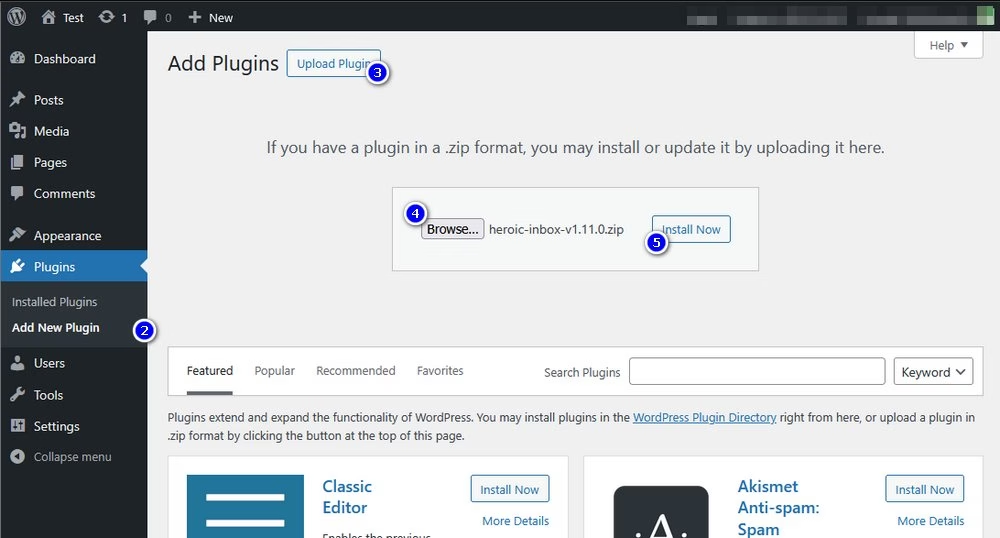
To install the ticketing plugin in WordPress:
- Access your website dashboard by adding /wp-admin/ at the end of your domain name.
- Click on the Plugins menu from the left sidebar > Add New Plugin
- Click on the Upload Plugin button
- Browse and select downloaded Heroic Inbox zip file
- Click Install Now
- Activate the plugin
You will be prompted with a Welcome Wizard.
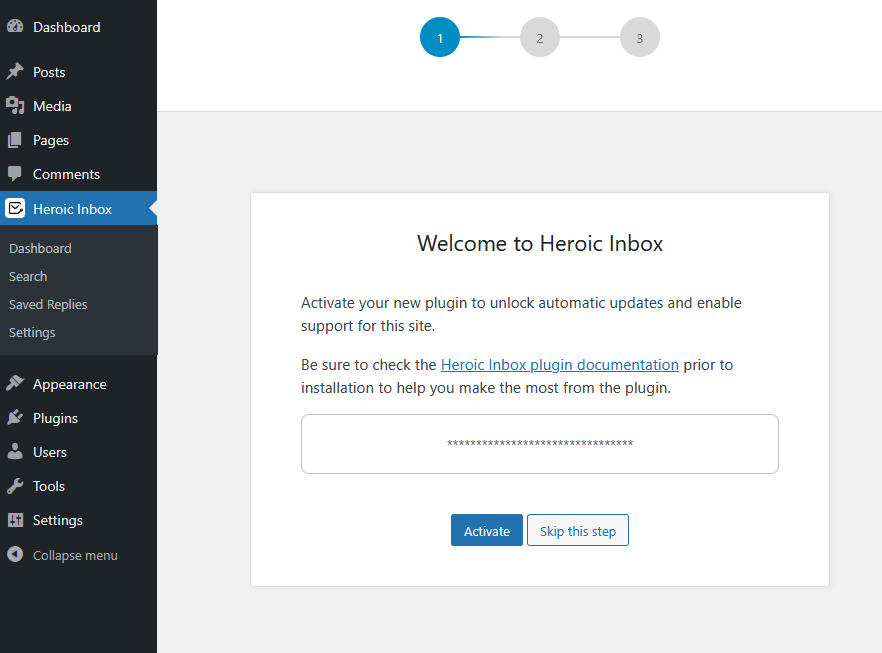
Activate the plugin with a License key, which can be found where you downloaded the plugin files from.
Now add a new mailbox based on your existing system:
- IMAP/SMTP
- Gmail
- Outlook
For the sake of this tutorial, let’s connect a Gmail account with Heroic Inbox:
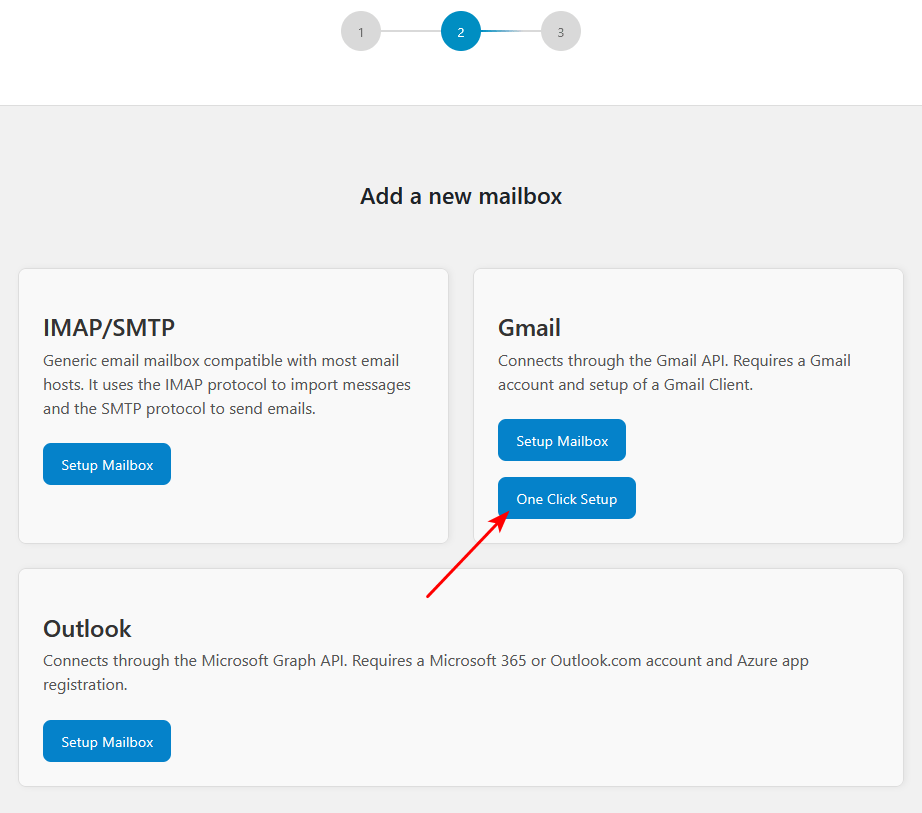
- Click on the One click Setup button from the Gmail section
- Choose or login with the preferred account
- Provide HeroThemes access to your Google account
- Import all emails, or proceed based on your preferences
Congratulations! 🎊 you are done setting up your first mailbox. That’s how simple it is to set up a Heroic Inbox.
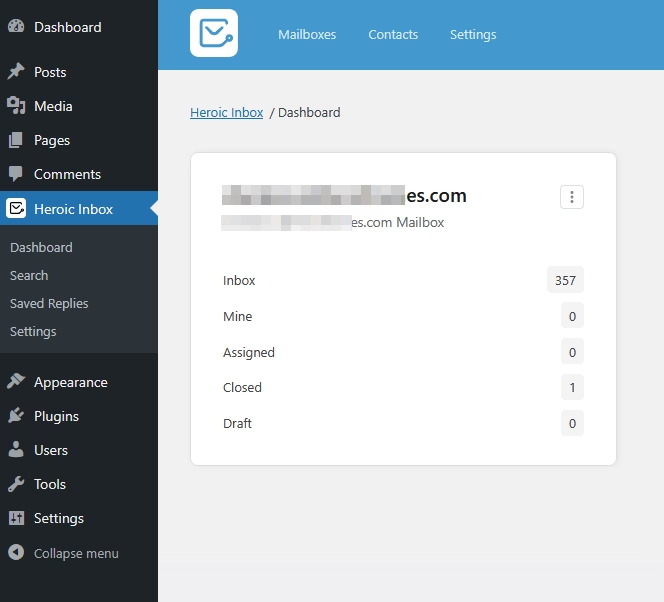
Step 2: Configuring Helpdesk Settings
Here are a few things you should do to get the most out of Heroic Inbox.
1. Adding Users
The process of adding and assigning users to the created mailboxes is very straightforward.
- Access your website with an administrator account
- Click on the Users menu from the left sidebar > Add New User
- Fill out the form
- Set the user role (Note: you need to set the role contributor or higher to be able to access Heroic Inbox)
- Click on the Add New User button to complete the process.
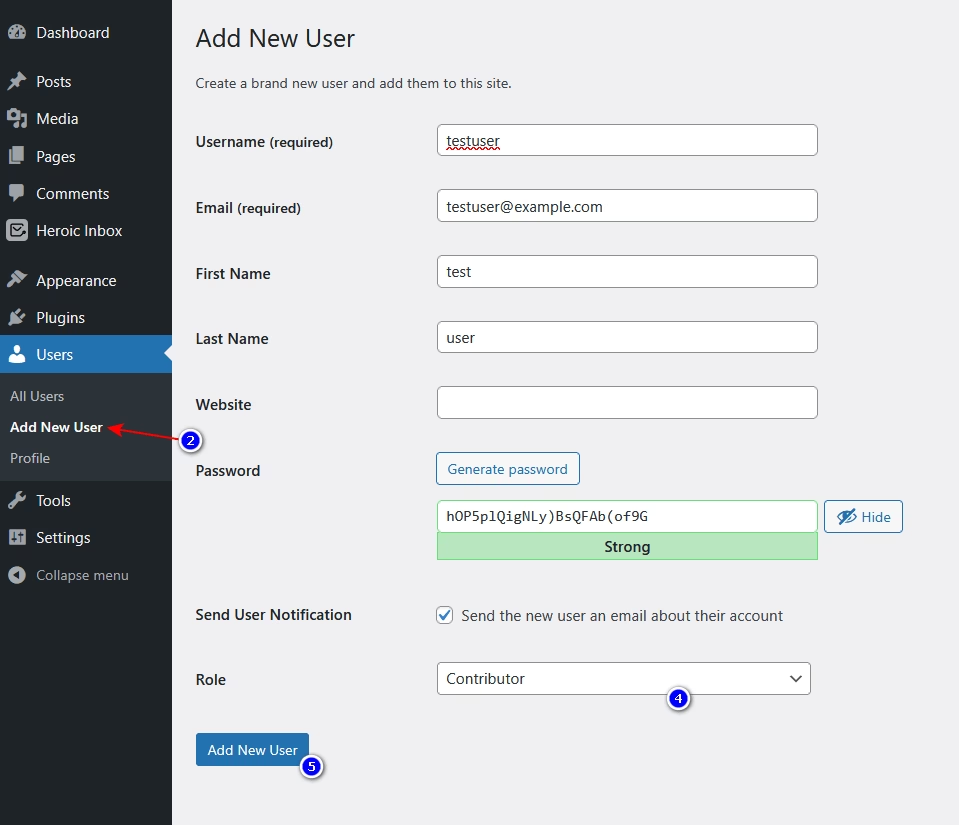
Now head over to:
- Heroic Inbox > Settings
- Mailboxes > choose your created Mailbox
- In Users settings > Add User > choose your created user and assign desired role.
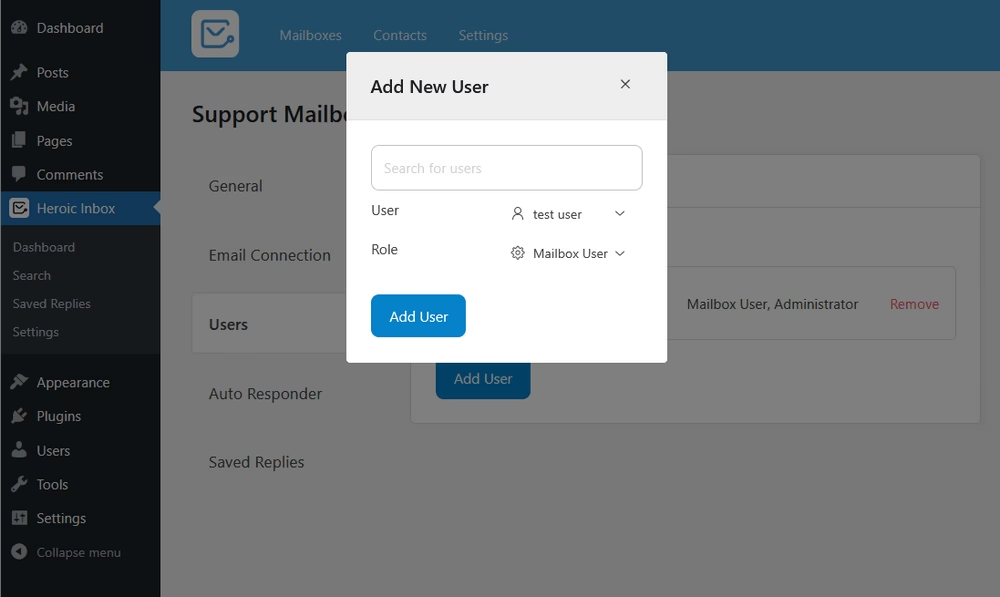
That’s how you add new users to your Mailbox with Heroic Inbox. Heroic Inbox doesn’t add any limits to the users, so you can add as many users as you want.
Don’t forget to test out things. I’m sure everything will work out😉.
2. Creating Saved Replies, or Templates
Saved Replies (email templates) is a very handy feature to save tons of your team’s time.
Create a collection of premade responses, select it and send.
For example, you can create premade response templates for these scenarios:
- Follow-up emails
- Cold email outreach
- Answering repeated questions (such as refund policy, pricing structure)
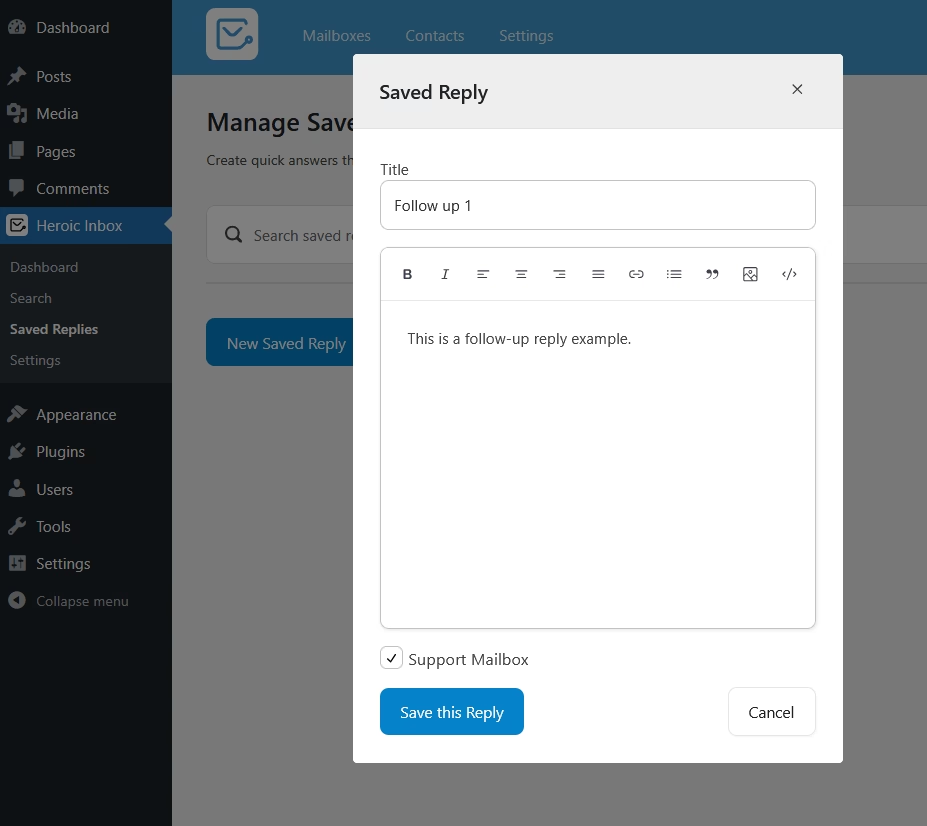
To add saved replies in Heroic Inbox:
- Access your website dashboard
- Heroic Inbox > Saved Replies
- Click on the New Saved Reply button
- Fill out the form and Save the changes.
Whenever you reply to an email or add a note, you can use this premade template by clicking on the saved reply icon.
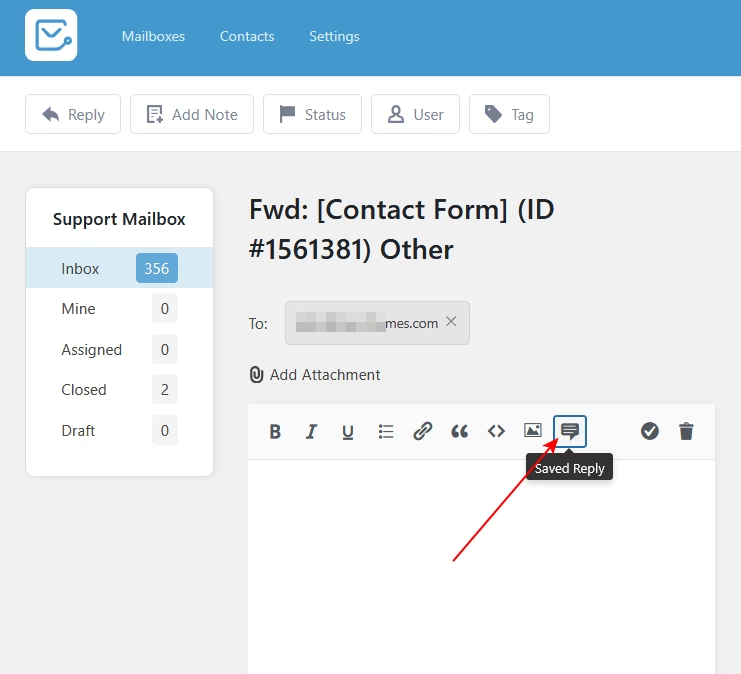
You get the idea of how to use Heroic Inbox. There are many other features in Heroic Inbox that are worth exploring such as auto responders, and statuses. Try out yourself and let me know what you think by commenting below.
Step 3: Creating a Front-End Ticket Submission Form
It is always best to collect all possible information about customer issues, but don’t overdo it and make these forms tedious to fill.
Having enough information will help you assign the right team member to solve the problem, and solve customer issues with a first interaction.
Here’s common information you should typically collect from a ticket submission form:
- Customer name
- Email address
- Type of customer service (free, or premium customer)
- Issue category (general, pre-sales queries, partnerships, billing, technical, or account support)
- Brief subject
- File attachment
How to create a ticket submission form
WordPress has many free and paid options to create a ticket submission form with. But I highly recommend WPForms and Formidable Forms due to their simplicity and feature rich free option.
For example, to create a ticketing form with WPForms:
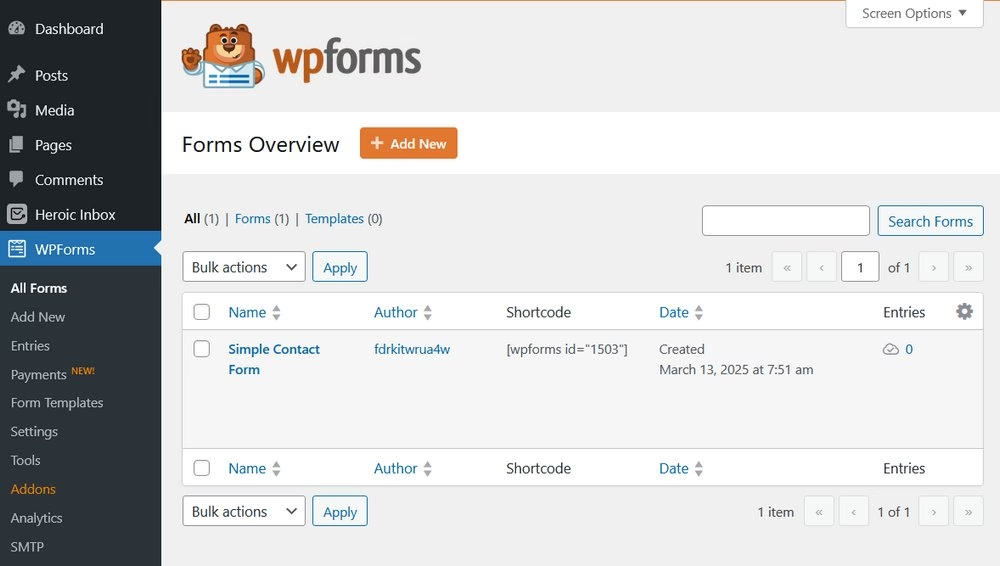
- Install a WPForms plugin from your website’s plugins section (Note: you can directly install WPForms by searching on WordPress plugins directory)
- Activate the plugin
- Access WPForms settings from left sidebar menu > Add New
- Use AI, premade form templates, or drag and drop builder to build your form
- Update Notification Settings. Send the form details to the mailbox email address you previously set up with the Heroic Inbox.
- Play around with other settings that you would like to set and hit the Save button.
You have successfully created your ticket submission form. Now it’s time to embed it into your website page. Most likely on your contact page.
To embed the WPForms form in a web page:
- Edit a page where you want to add a ticket submission form
- Insert a WPForms block into your page (you can search for WPForms block or type /wpforms to get this block)
- Select your created form
- Save the changes
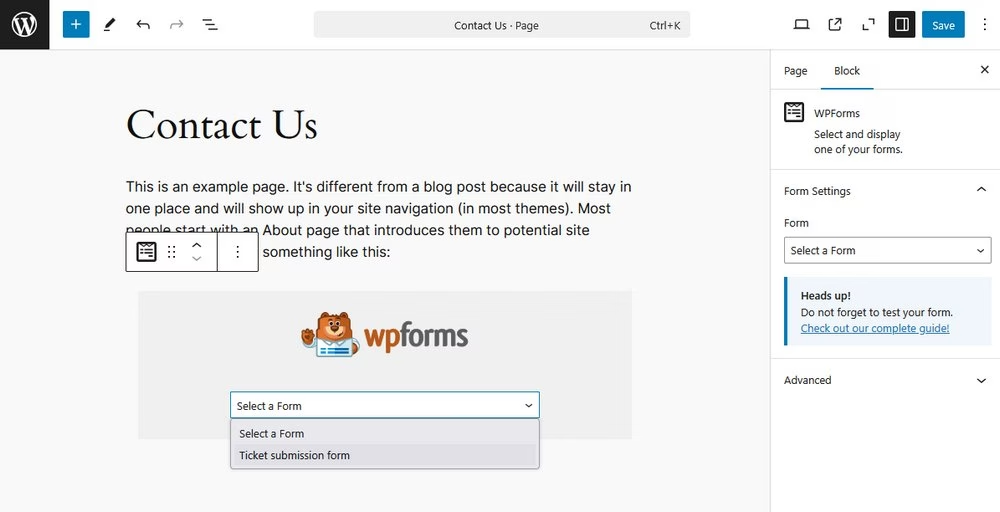
That’s it! Fill out the form through the front end of the web page and make sure you are properly receiving email.
Ticketing System Best Practices
A well implemented ticketing system needs to be paired with smart workflows to achieve maximum efficiency. Here are some practices that you should follow while creating your ticketing system.
1. Optimize Ticket Submission
You should provide customers with an easy way to reach the customer support team, but they don’t have to create the ticket for every single query.
Try solving common issues before they become support tickets. Plus, don’t make the submission process so horrible that customers decide to go with another product.
Here’s what you can do to optimize your ticket submission process:
- Add a search box to search for self-help content (knowledge base guides).
- Provide a common troubleshooting guide on the ticket submission form to resolve common issues quickly.
- Create different forms for different scenarios (for example, pre-sales, partnerships).
- Create a multi-step form If your form is longer.
We explored more about support ticket forms through our in-depth guide, check it out!
2. Categorization and Prioritization
By categorizing and prioritizing tickets — agents work on tickets relevant to their expertise, leading to faster resolutions, efficiency and customer satisfaction.
Here’s all benefits of Categorization and Prioritization:
- Agents work on tickets relevant to their expertise
- Workload optimization
- Reduced response time and faster resolutions
- Improved efficiency and productivity
- Enhanced customer experience with cleaner and more accurate responses
- Accurate reporting and Insights on common issues and team performance
- Improved self-service suggestions
- Less duplicate efforts
- Improved customer retention
So don’t miss out on this one.
3. Automate Where Possible
Customer support or ticketing systems are one of the places where businesses can greatly benefit from automation.
For example, automation in ticketing system can be used to:
- Ticket assigning: Auto assigning tickets to the right agents based on ticket context. If a ticket has a mention of partnership, marketing — you can create a rule to auto assign such tickets to specific agents.
- Canned responses to speed up replies to common queries.
- Ticket prioritization: Based on ticket categorization and type of customer (free or paid), tickets can be prioritized to be completed on time or delayed.
- Improve self-service suggestions and auto responses: AI is revolutionizing how we offer customer service. You can use AI to send better, useful auto responses before a customer service agent jumps in.
- Workflow automation: To auto-close resolved tickets, follow-up reminders, notification about delayed tickets, ticket assigning, tagging, and feedback collection.
- Reporting and analytics automation: Timely based reporting on key metrics such as first response time, customer satisfaction, or number of resolved tickets.
Explore:
Customer Service Automation: What It Is, Examples & How To
Fast Customer Service: Why It Matters + 5 Strategies
4. Ensure Effective Ticket Resolution
In a ticketing system First-Contact Resolution (FCR) matters a lot. It basically shows you how effective your customer service team is.
FCR is calculated based on how many tickets are resolved with a first response (usually a response from a human).
No one likes follow-ups, it’s a time-consuming process that often takes days and causes dissatisfaction.
So, ensure you try to aim for better FCR scores. Here are few tips:
- Track recurring issues and update documentation.
- Use internal notes. Typically, senior management knows all the ins and outs of the product issues, so adding a note for a junior member helps with the FCR.
- Route tickets to the right agent (Skill-based routing) and ensure complex issues reach the senior support staff.
- Equip support agents with the right tools and knowledge. A well-documented centralized knowledge base is what you are looking for here.
- Customer history tracking: A convenience feature to track all customer conversations to help you understand previous issues and get more information.
5. Use Analytics and Feedback
Regularly tracking key customer service metrics will help you understand your customer service team performance.
There are few important metrics you should track and aim to improve in ticketing systems.
- Response time
- First-contact resolution (FCR)
- Customer satisfaction score
- Customer feedback
6. Encourage Leadership
Having strong leadership in a ticket management system will make a huge difference in how your customer support team handles their day-to-day tasks.
Encouraging leadership will help with:
- Promoting accountability and recognition
- Reduces operational costs
- Provide continuous training and encourage active listening among agents
- Set clear goals and expectations
7. Encourage Knowledge Retention
We have seen the benefits of encouraging leadership, but having more than one leader (for a team) will cause more negative consequences than positive ones. Such as conflicting opinions, unclear authority, blame shifting and so on.
Team members often look for growth opportunities — in such cases you have to let them go. Leaving a huge knowledge gap behind and a constant loop of training new employees.
Knowledge retention is a practice that most successful companies follow. For example, employees have to go through 1–3 months of notice period, where they have to note down their daily tasks, create SOPs, guides, train new employees, and so on.
In the ticketing system (or in general) you can use this opportunity to improve your knowledge base, create missing guides on repeated questions and issues, and understand what’s tested, working and not working.
Frequently Asked Questions
What is SharePoint? Is it good for a ticketing system?
You will often find SharePoint as a recommended tool for building a ticketing system.
SharePoint is a web-based platform to manage internal documents, for use as an intranet website, or as an external website for company news and posts.
You can use it as a ticketing tool, but it’s very complicated compared to WordPress or SaaS platforms.
If your business relies on a Microsoft suite then I will recommend trying it out, otherwise No.
Conclusion
Even a basic ticketing system will be a much better option than using none. We talked about a lot of benefits of it, here’s a recap:
- Helps prioritizing tasks
- Increase efficiency and productivity
- Keeps things organized and not forgetting something
- Improves transparency
When you look at these benefits, the cost of the ticketing system software like Heroic Inbox easily gets recovered within the first month.
You don’t need fancy software with hundreds of features that creates more bugs and issues with each update, and costs tons of dollars each month.
You need reliable, well-coded ticket management software with an important set of features that work like charm every time, so you can focus on solving customer issues — not your system.
Try Heroic Inbox, it’s affordable and comes with a 14-day money back guarantee.


