Heroic Inbox makes it easy to manage customer support emails and tickets directly on any WordPress website. This is how to install it. Read the written instructions below.
Installation & Activation
- Download the Plugin
- Download the Heroic Inbox plugin zip file from your account
- Navigate to your WordPress Dashboard
- Upload to WordPress
- Go to Plugins → Add New
- Click the Upload Plugin button at the top
- Click Choose File and select the
heroic-inbox-v3.zipfile - Click Install Now
- Activate the Plugin
- Once installation is complete, click Activate Plugin
- You’ll see Heroic Inbox appear in your WordPress admin sidebar

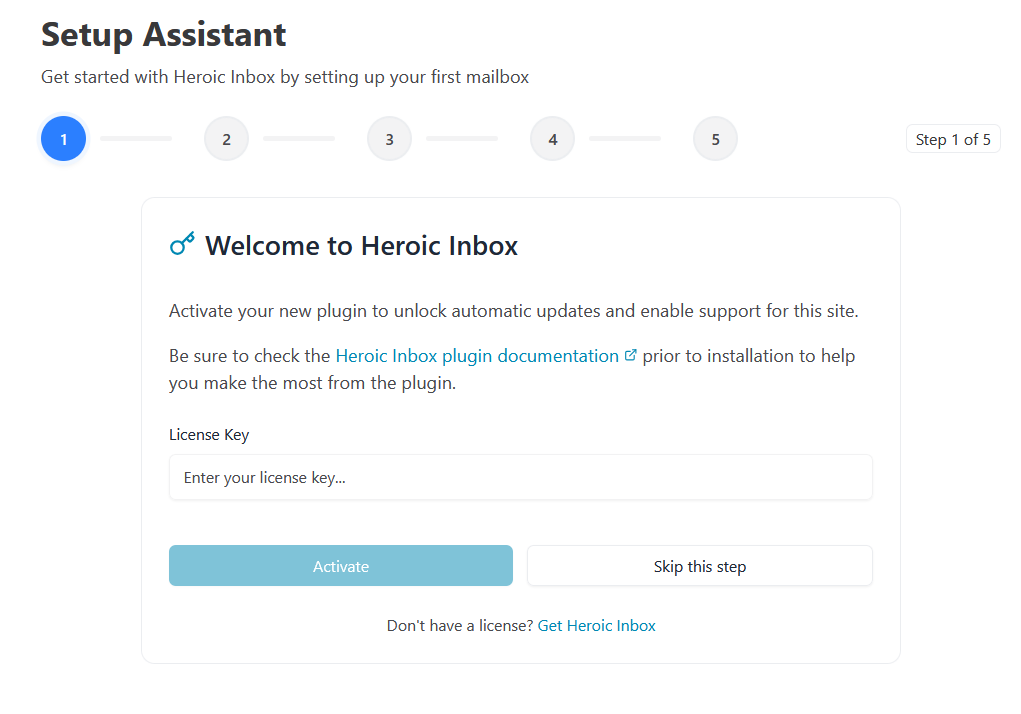
Activating Your License Key
Before you can connect mailboxes, you need to activate your license key.
Welcome to Heroic Inbox Screen:
- After activation, you’ll see the Setup Assistant with a welcome screen
- The heading reads “Welcome to Heroic Inbox”
- Copy your license key from your HeroThemes account
- Paste the license key into the input field
- Click Activate button
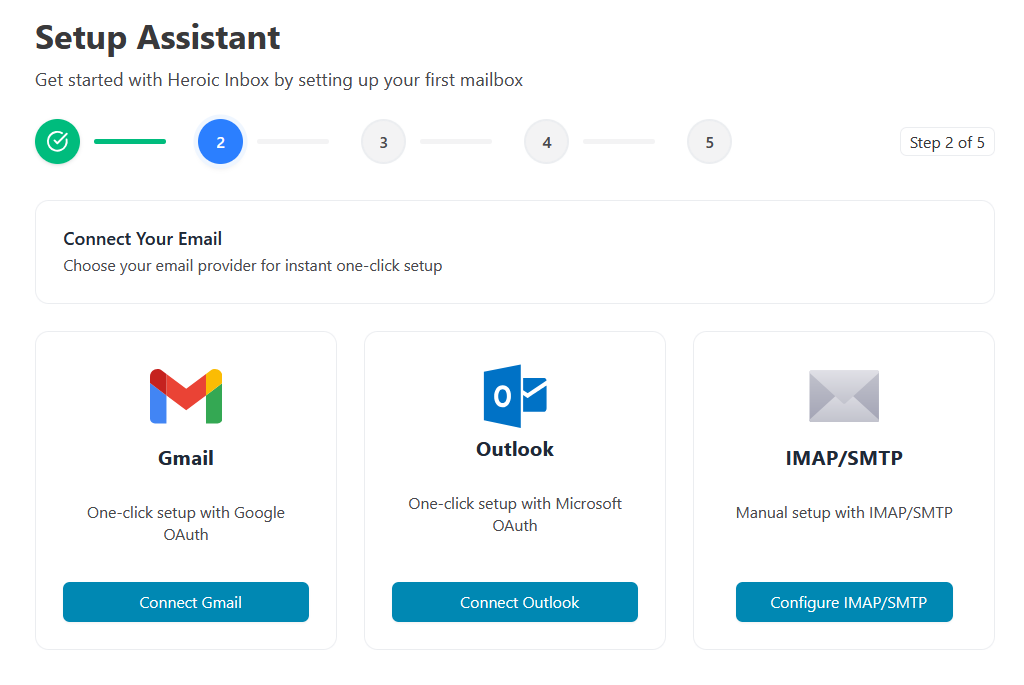
The Setup Assistant
The Setup Assistant guides you through connecting your first mailbox step-by-step.
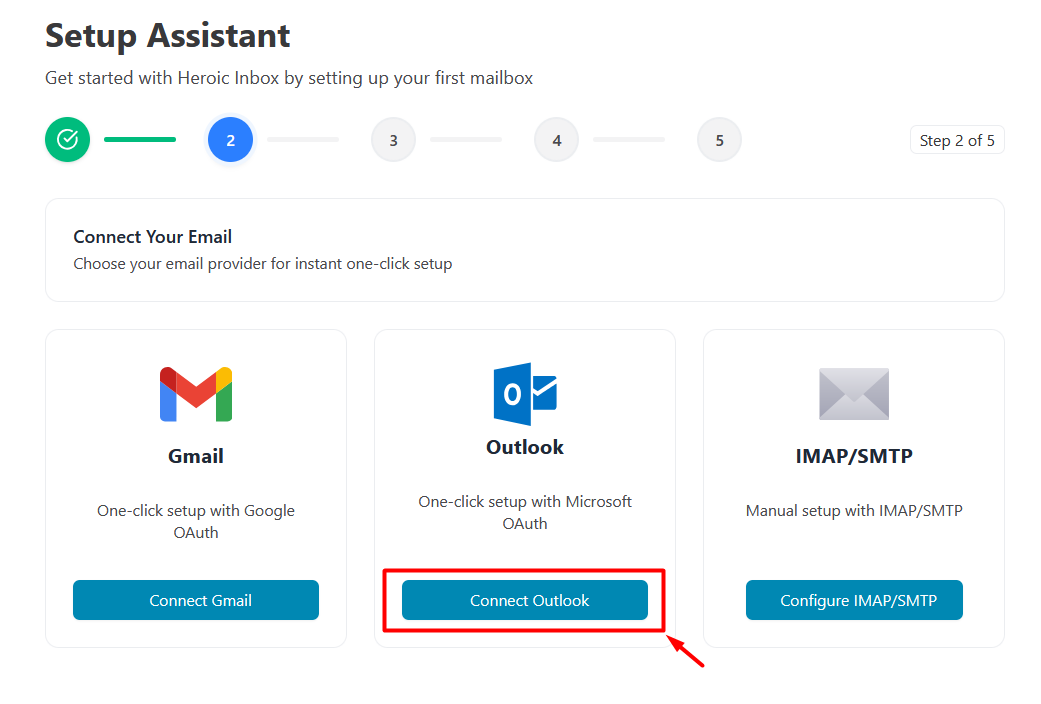
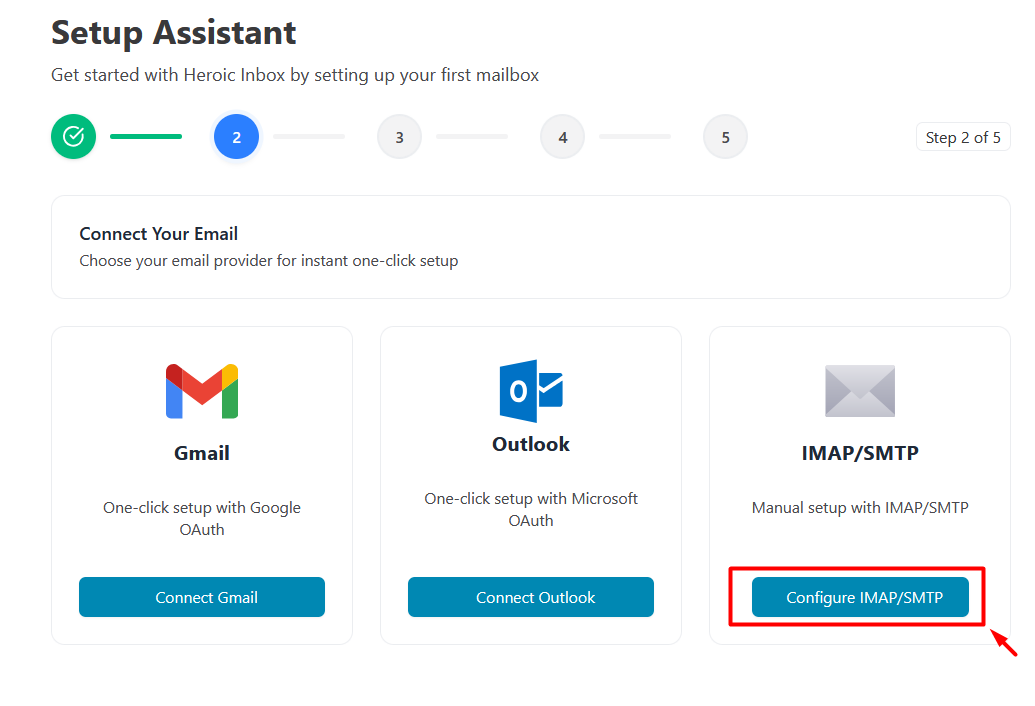
Connect Your Email
After activating your license, you’ll see the “Connect Your Email” screen with three provider options:
Three Provider Cards:
Gmail
- One-click setup with Google OAuth
- Button: “Connect Gmail”
Outlook
- One-click setup with Microsoft OAuth
- Button: “Connect Outlook”
IMAP/SMTP
- Manual setup with IMAP/SMTP
- Button: “Configure IMAP/SMTP”
Connecting a Google/Gmail Account
Gmail uses OAuth for secure, one-click connection.
- Start the Connection
- On the Setup Assistant screen, click “Connect Gmail”
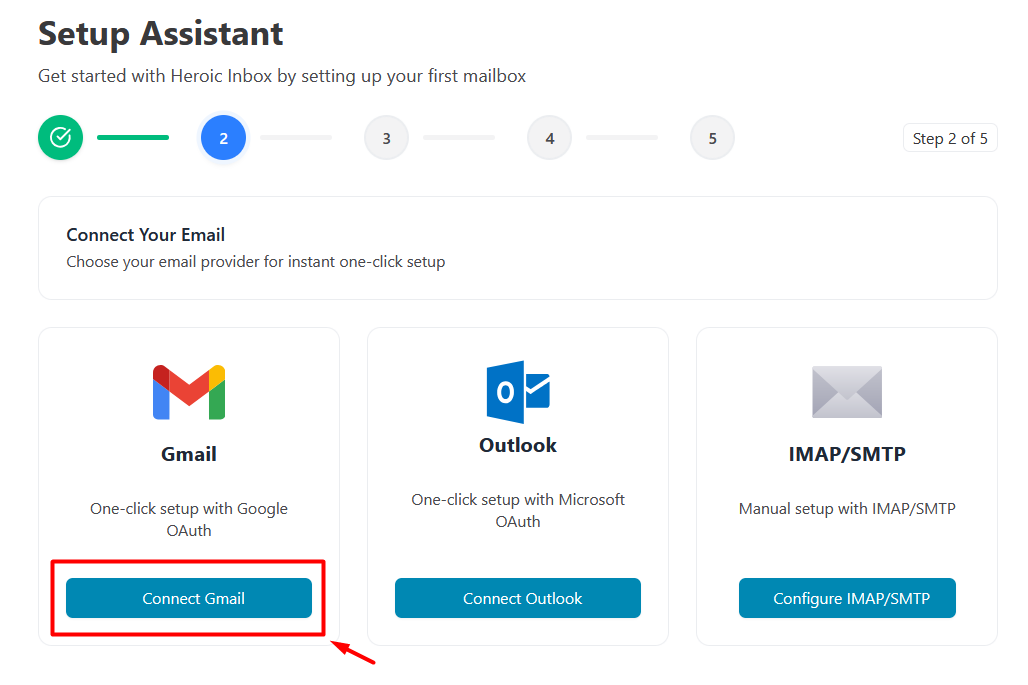
- You’ll be redirected to Google’s authorization page
- On the Setup Assistant screen, click “Connect Gmail”
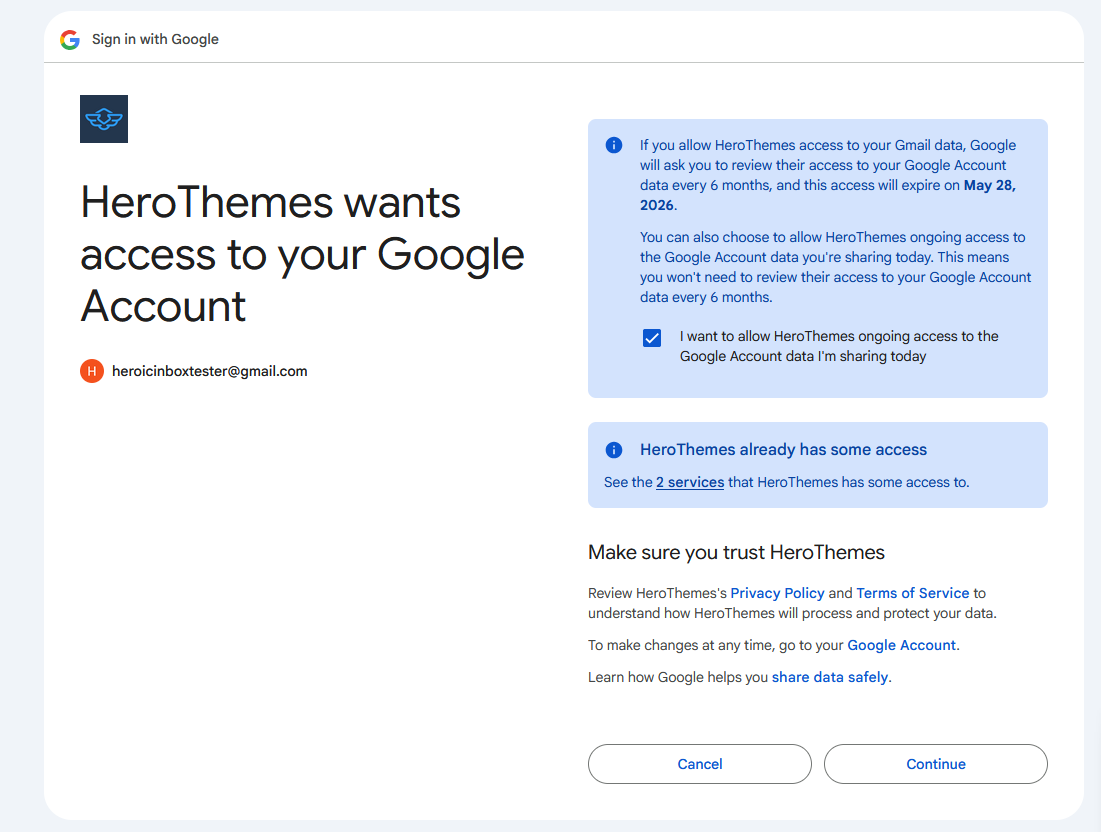
- Authorize with Google
- Select the Google account you want to connect (e.g., support@example.com)
- Review the permissions Heroic Inbox needs:
- Read, compose, send, and permanently delete email
- See and download contacts
- Click “Allow” to grant permissions then Continue
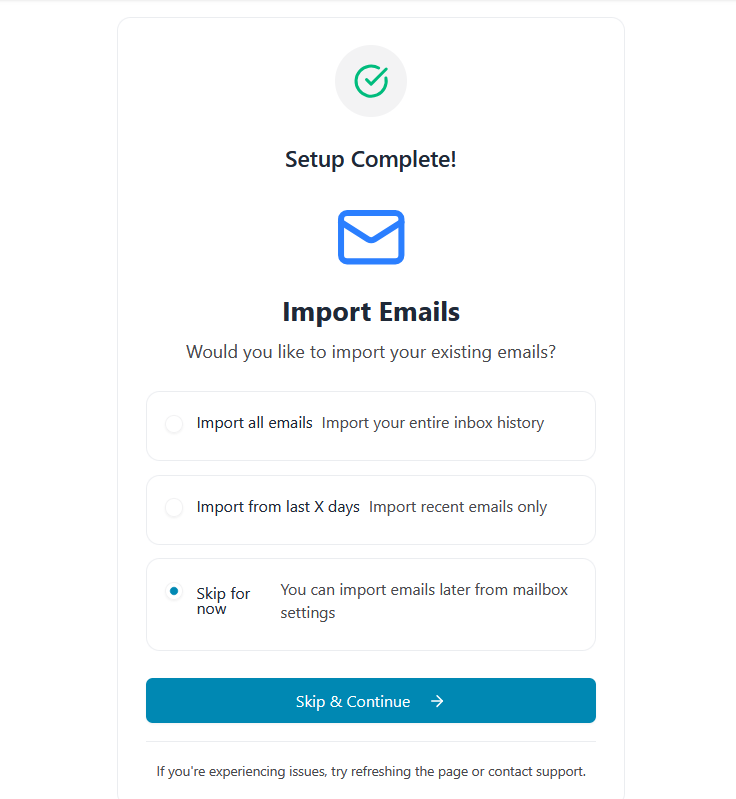
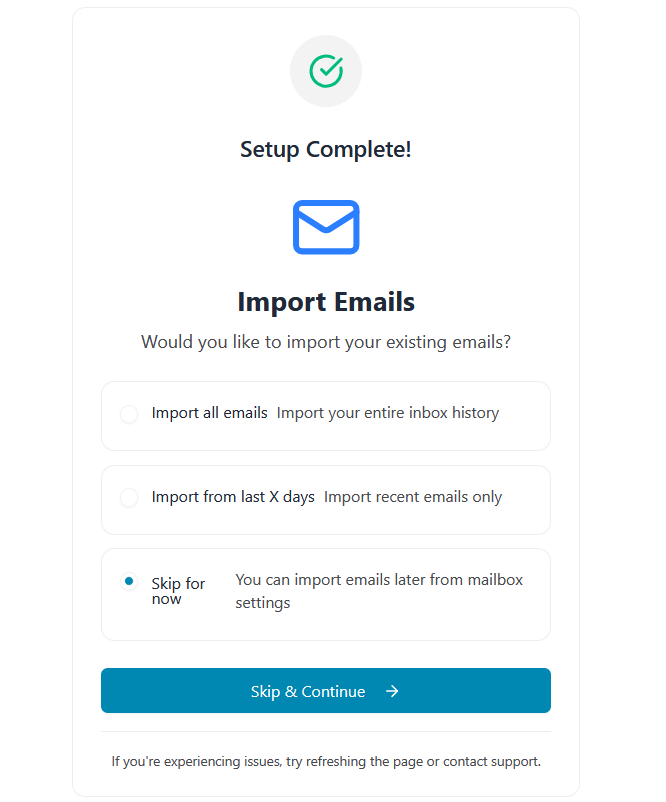
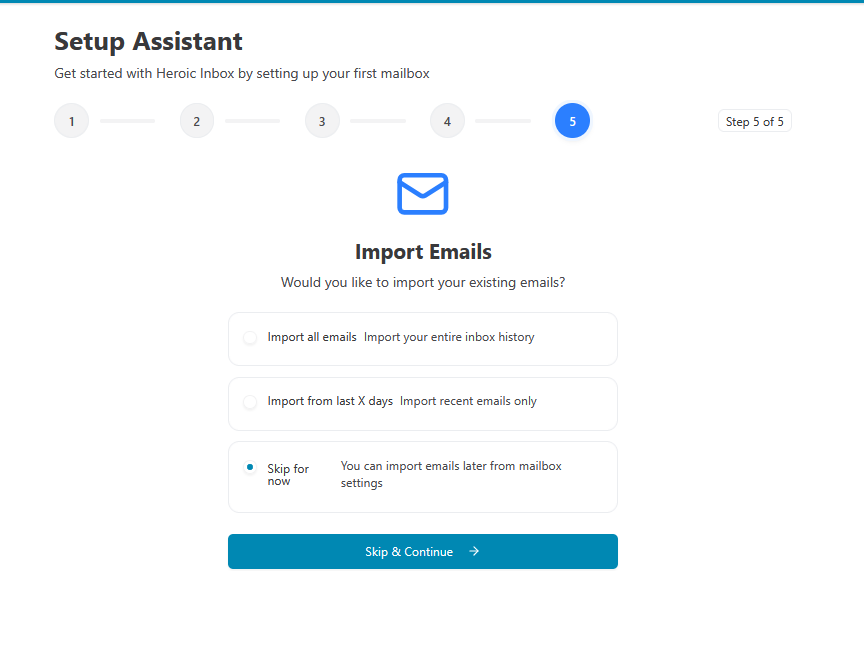
- Import Emails (Optional)
- After successful connection, you’ll see the “Import Emails” screen
- Choose one of three options:
- Import all emails – Import your entire inbox history
- Import from last X days – Import recent emails only (default: 7 days)
- Skip for now – You can import emails later from mailbox settings
- Click “Start Import” or “Skip & Continue”
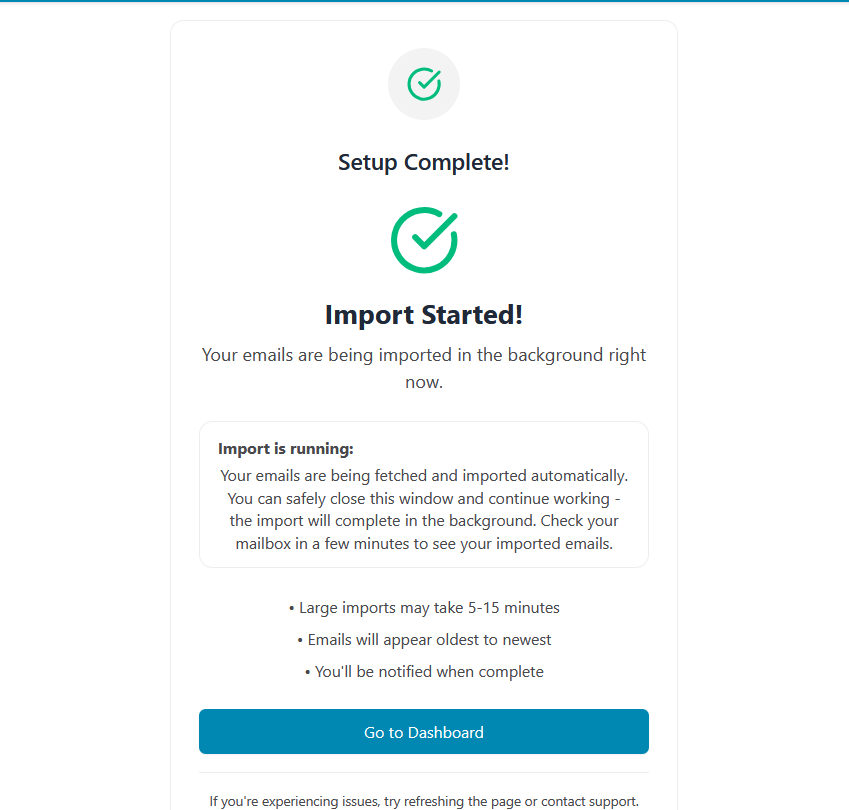
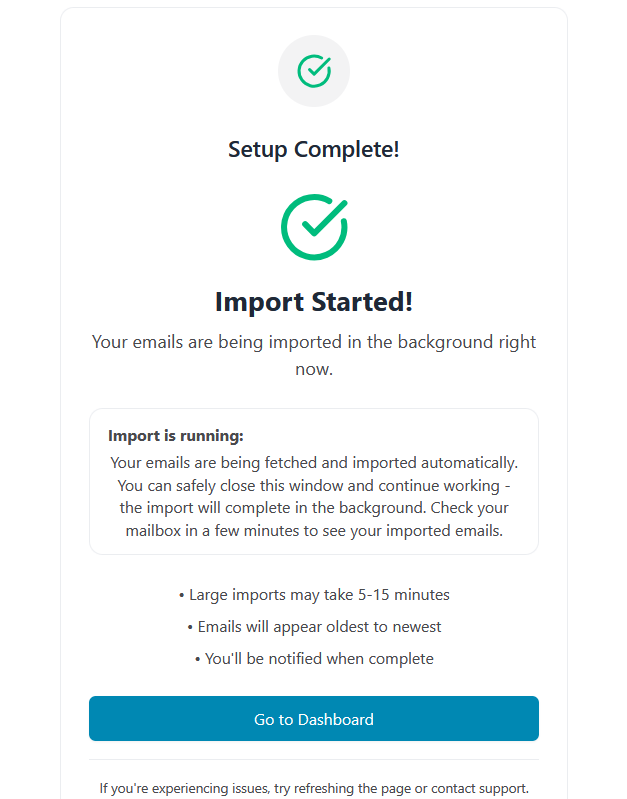
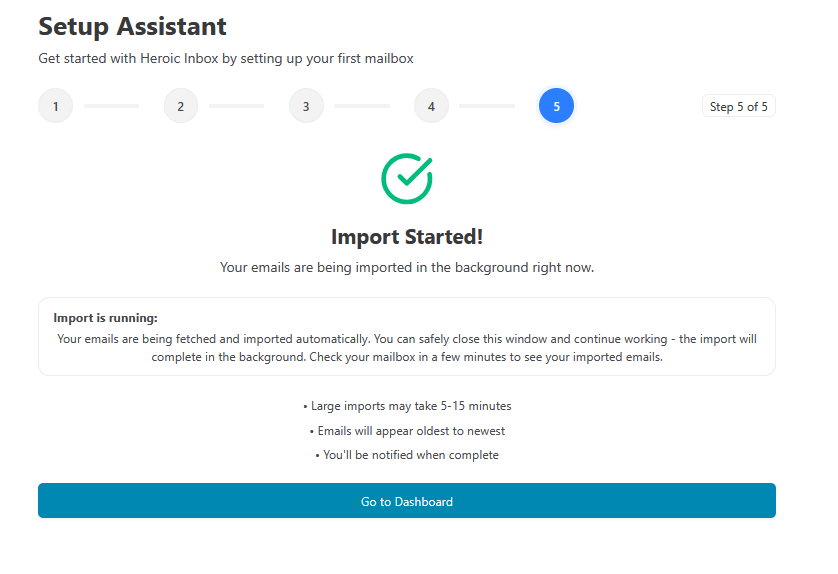
- Import in Progress
- If you chose to import, you’ll see: “Import Started!”
- Message: “Your emails are being imported in the background right now.”
- Important notes displayed:
- Large imports may take 5-15 minutes
- Emails will appear oldest to newest
- You’ll be notified when complete
- Click “Go to Dashboard”
Connecting an Outlook/Microsoft 365 Account
Microsoft Outlook and Office 365 accounts connect using OAuth.
- Start the Connection
- On the Setup Assistant screen, click “Connect Outlook”
- You’ll be redirected to Microsoft’s authorization page
- On the Setup Assistant screen, click “Connect Outlook”
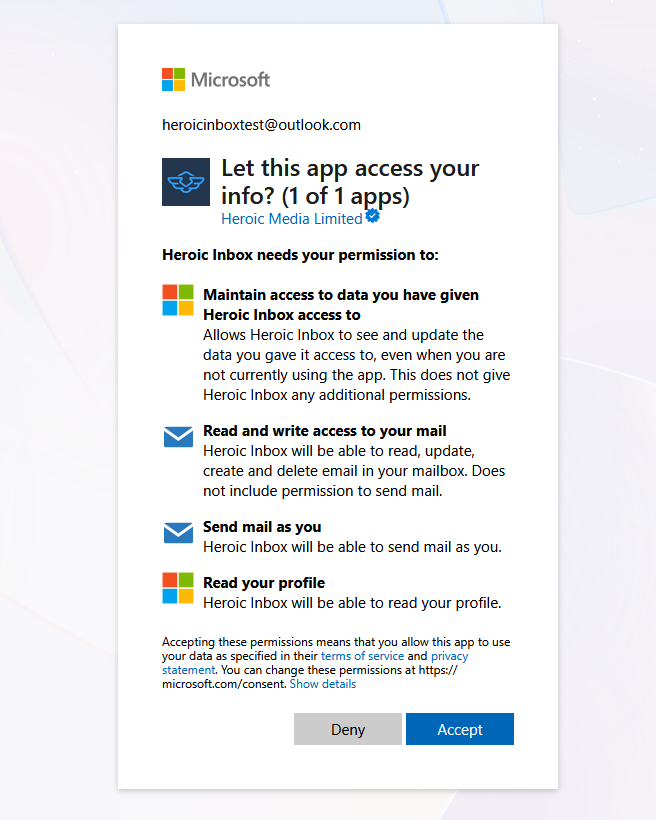
- Authorize with Microsoft
- Sign in with your Microsoft account credentials
- Review the permissions Heroic Inbox needs:
- Send mail as you
- Read and write access to your mail
- Have full access to your mailboxes
- Click “Accept” to grant permissions
- Import Emails (Optional)
- After successful connection, you’ll see the “Import Emails” screen
- Choose one of three options:
- Import all emails – Import your entire inbox history
- Import from last X days – Import recent emails only (default: 7 days)
- Skip for now – You can import emails later from mailbox settings
- Click “Start Import” or “Skip & Continue”
- Import in Progress
- If you chose to import, you’ll see: “Import Started!”
- Message: “Your emails are being imported in the background right now.”
- Important notes displayed:
- Large imports may take 5-15 minutes
- Emails will appear oldest to newest
- You’ll be notified when complete
- Click “Go to Dashboard”
Connecting via IMAP/SMTP
For other email providers (Bluehost, SiteGround, Zoho, cPanel, etc.), you can connect manually using IMAP/SMTP.
Before You Begin
You’ll need these settings from your email provider:
- Email Address – Your support email (e.g., support@example.com)
- IMAP Server – Incoming mail server (e.g., mail.example.com)
- IMAP Port – Usually 993 (SSL) or 143 (TLS)
- SMTP Server – Outgoing mail server (e.g., mail.example.com)
- SMTP Port – Usually 465 (SSL) or 587 (TLS)
- Username – Usually your full email address
- Password – Your email account password
Tip: Check your hosting provider’s documentation for these settings.
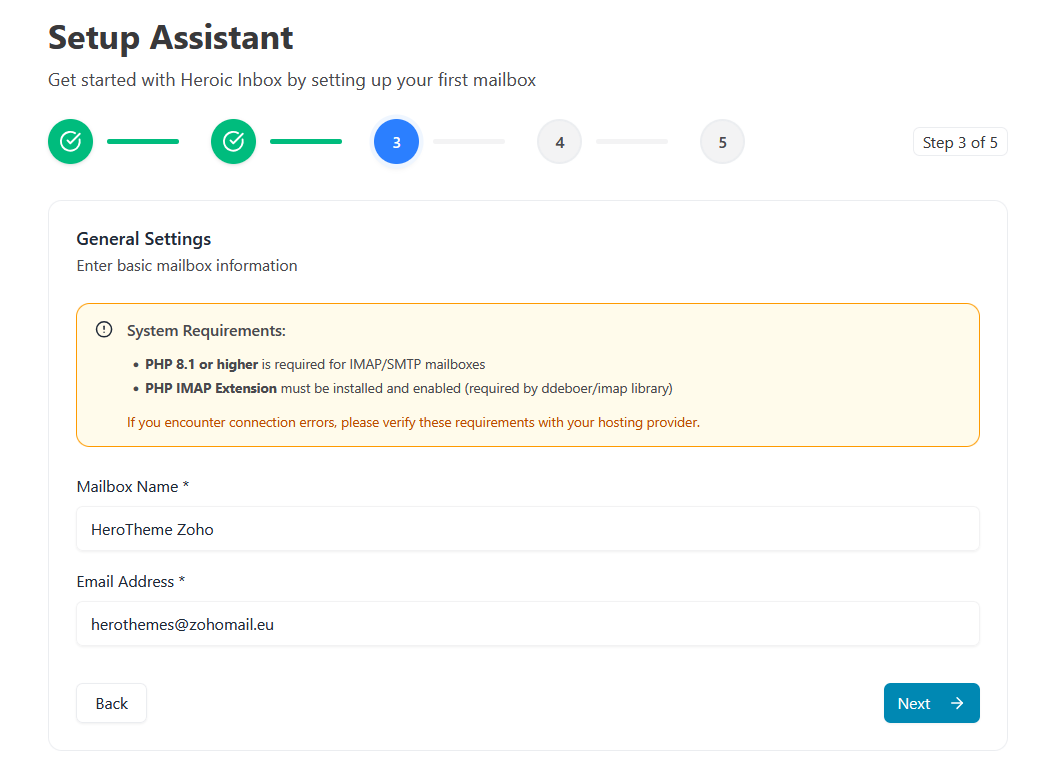
Step-by-Step Instructions
- Select IMAP/SMTP
- On the Setup Assistant screen, click “Configure IMAP/SMTP”
- On the Setup Assistant screen, click “Configure IMAP/SMTP”
- General Information
- Mailbox Name: Give your mailbox a friendly name (e.g., “Example Support”)
- Email Address: Enter your support email address
- Click Next or continue to IMAP settings
- IMAP Settings (Incoming Mail)
- IMAP Server: Enter your incoming mail server
- IMAP Port: Select 993 (SSL) or 143 (TLS)
- Encryption: Choose SSL or TLS
- Username: Your email address or username
- Password: Your email password
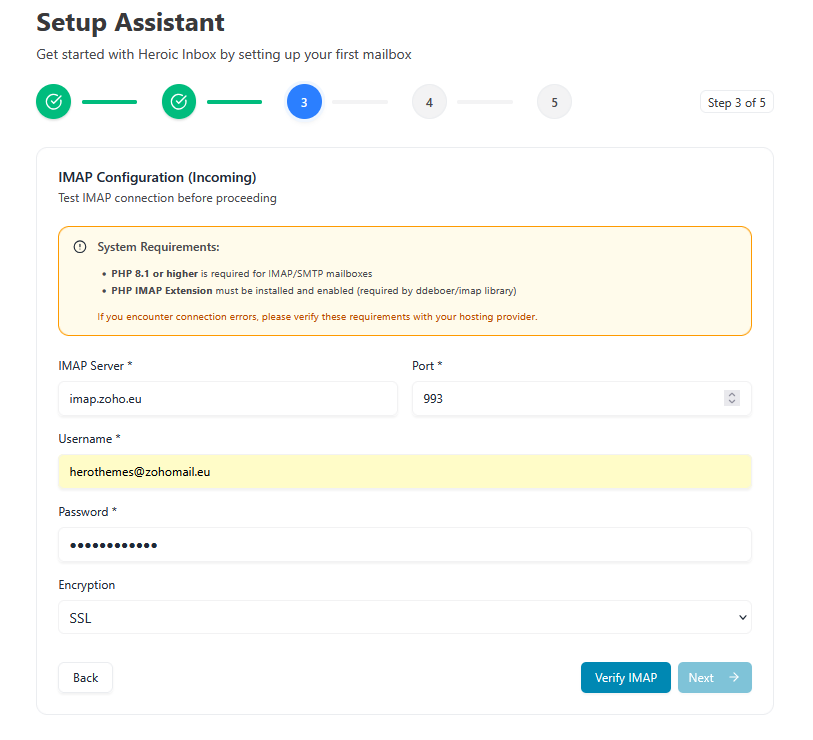
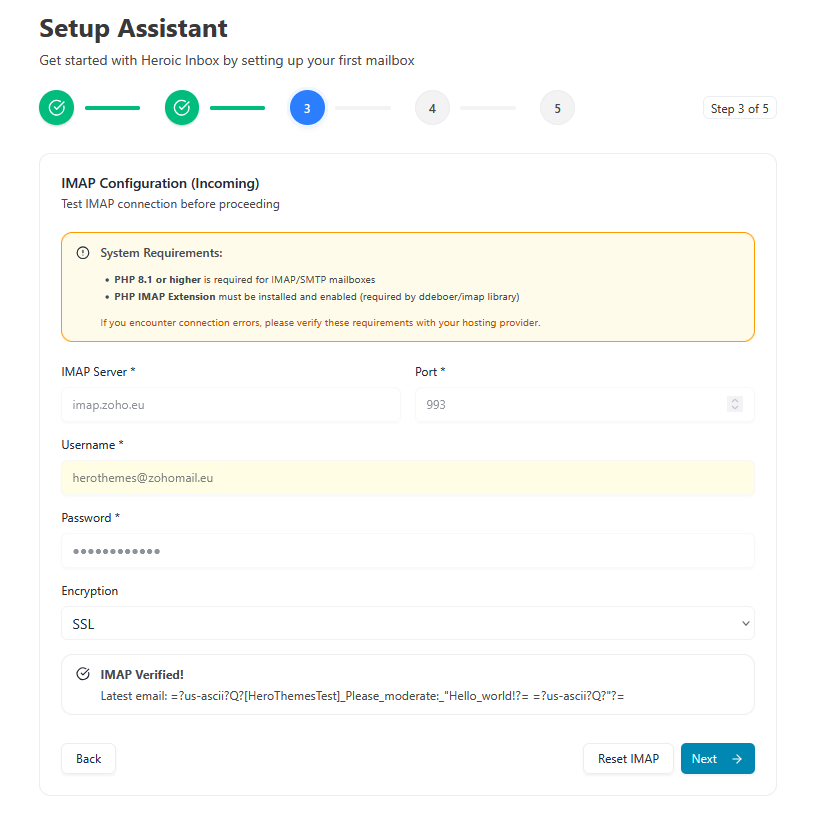
- Test IMAP Connection
- Click “Test Connection” button
- Wait for verification
- Green success message: Connection successful!
- If it fails, double-check your settings
- SMTP Settings (Outgoing Mail)
- SMTP Server: Enter your outgoing mail server
- SMTP Port: Select 465 (SSL) or 587 (TLS)
- Encryption: Choose SSL or TLS
- Username: Your email address or username
- Password: Your email password
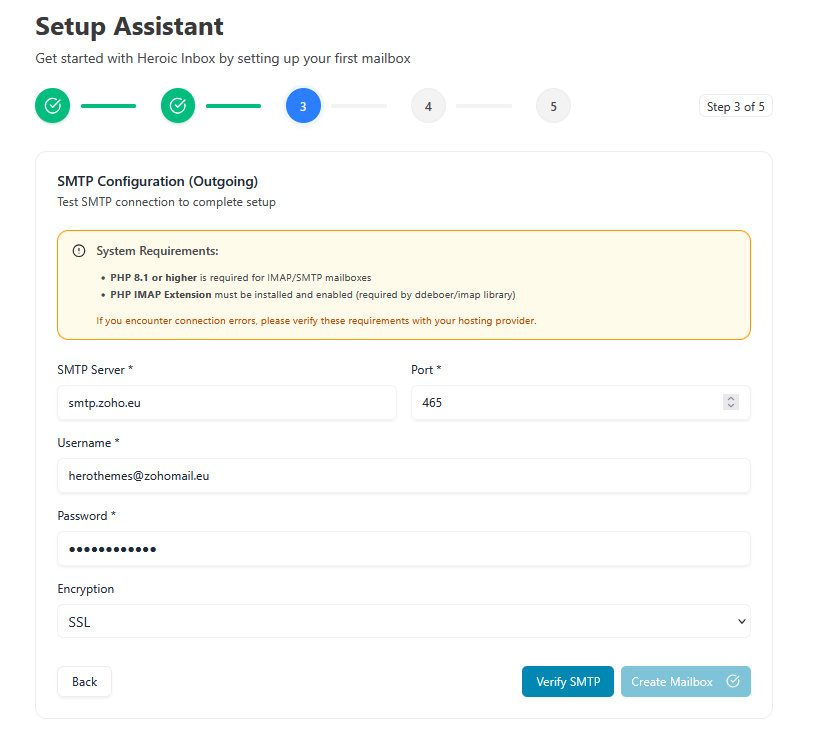
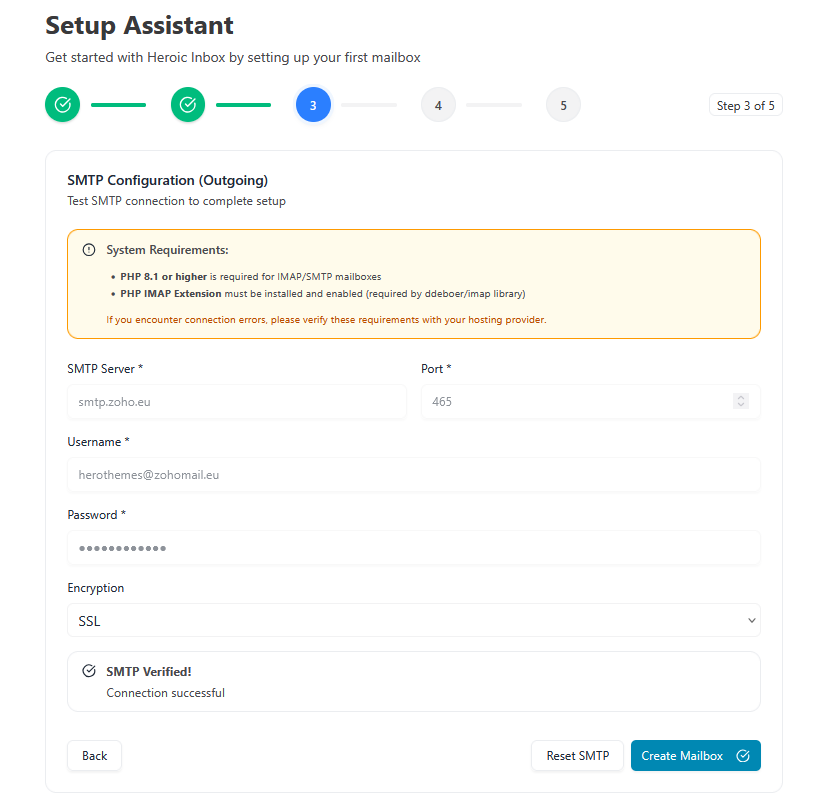
- Test SMTP Connection
- Click “Test Connection” button
- Wait for verification
- Green success message appears then click Create Mailbox
- Import Emails (Optional)
- After successful connection test, you’ll see the “Import Emails” screen
- Same three options as OAuth connections:
- Import all emails
- Import from last X days
- Skip for now
- Complete Setup
- Click “Go to Dashboard”
- Your IMAP/SMTP mailbox is now active!
Common IMAP/SMTP Settings
Here are settings for popular email providers:
Zoho Mail
- IMAP Server: imap.zoho.com
- IMAP Port: 993 (SSL)
- SMTP Server: smtp.zoho.com
- SMTP Port: 465 (SSL) or 587 (TLS)
cPanel / Generic Hosting
- IMAP Server: mail.yourdomain.com
- IMAP Port: 993 (SSL)
- SMTP Server: mail.yourdomain.com
- SMTP Port: 465 (SSL) or 587 (TLS)