Getting Started
To install the theme you must have WordPress already installed on your server. Please consult the WordPress installation guide or your web host provider for help with this.
1. Theme Installation
On purchase, you can download HelpGuru from your Downloads section on ThemeForest, you’ll need to download the complete theme package with the All files & documentation Download option and extract the helpguru.zip installable theme contained in the package to start the installation process.

The theme can be installed using either of the following two methods:
- WordPress Upload (recommended): In the WordPress admin panel navigate to Appearance > Add New Themes > Upload. Go to browse and select the zipped theme folder. Press install now and the theme will be uploaded and installed. This is the helpguru.zip extracted . If you get a missing style.css error, you will first need to extract helpguru.zip installable theme first.
- FTP Upload: Using your FTP program upload the un-zipped theme folder into the /wp-content/themes/ folder of your WordPress installation.
Once the theme is uploaded, you need to activate it. Go to Appearance > Themes and activate your theme.

2. Install and Activate Required Plugins
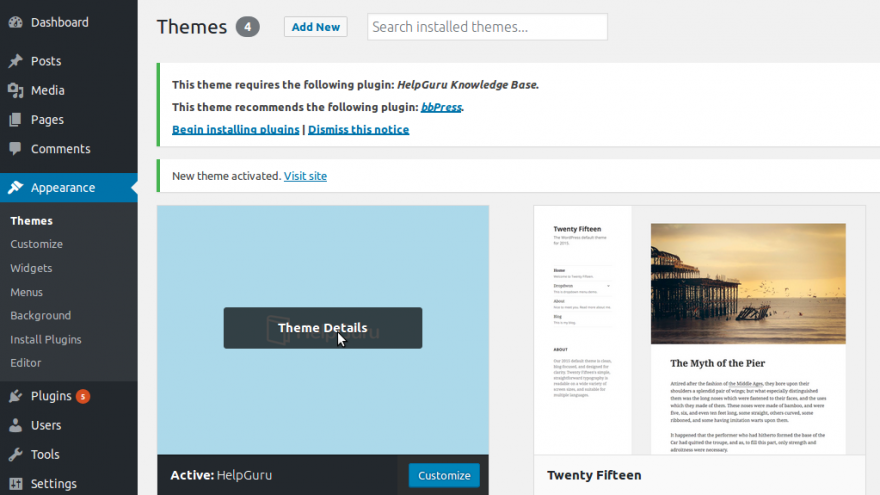
Upon activation, you will be prompted to install HelpGuru Knowledge Base and (optionally) bbPress. These are plugins which enable the functionality of the Knowledge Base and the Forums features of this theme.
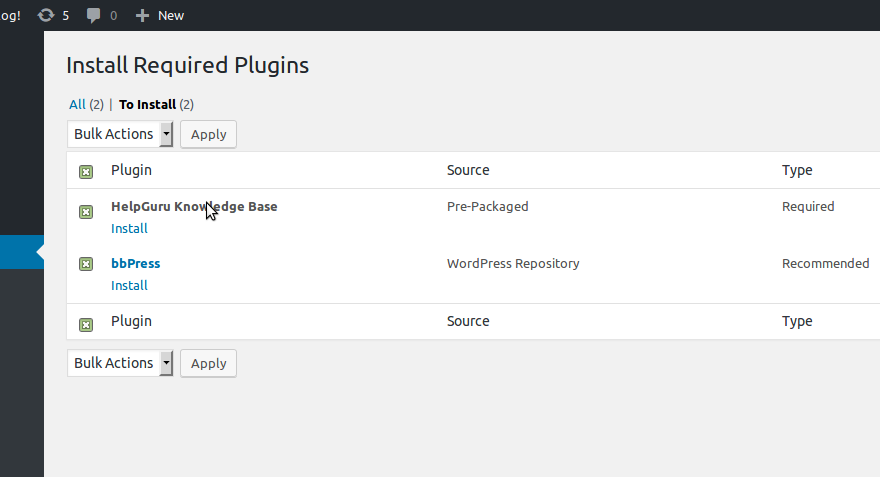
Select Begin installing plugins and select all the plugins and then install from the drop down. Click Apply. The plugins will be downloaded where appropriate. When the message appears again, return to the install required plugins page and activate each of the plugins in turn.
3. Setting up the HelpGuru Knowledge Base
Once your have installed and activated the plugins you will them be able to setup your knowledge base.
You can add content now, either by using the Set Up Sample Knowledge Base button from the Welcome screen, Installing the HelpGuru demo content (see later section) or start creating your own content.


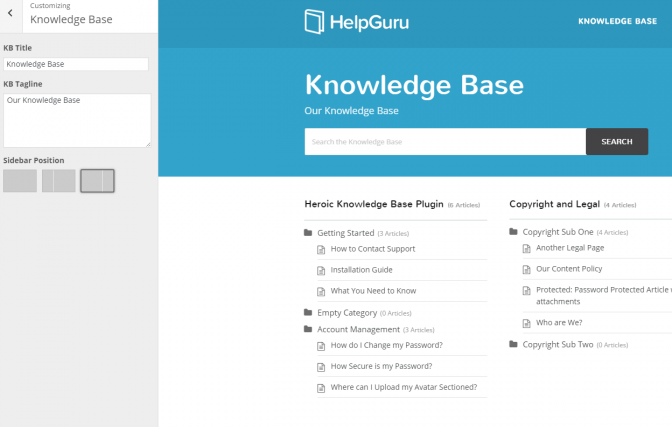
The title, tagline and sidebar position for the HelpGuru knowledge base section can be controlled from the theme customizer in Appearance > Customize > Knowledge Base.
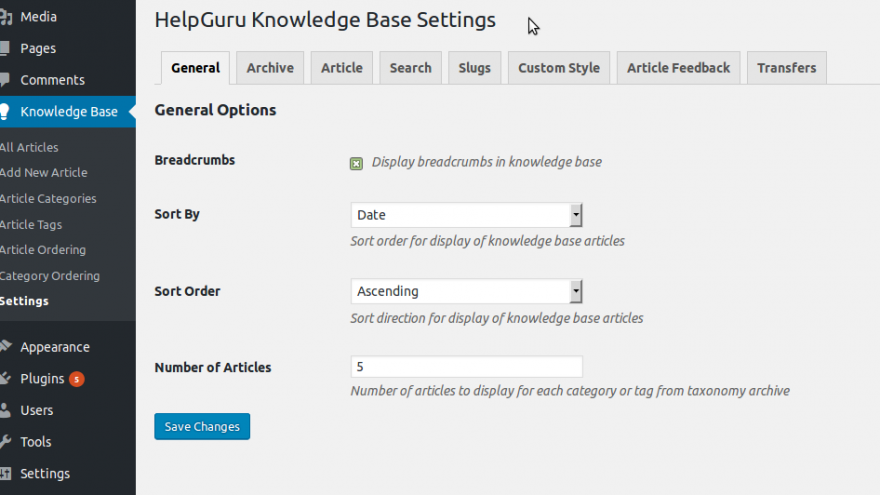
The settings for the HelpGuru knowledge base, can be found in Knowledge Base > Settings.
General Settings
Control the overall settings for the knowledge base, including
- Breadcrumbs display
- Sort By
- Sort Order
- Number of Articles
Archive Settings
Settings for the main knowledge base archive, including
- Number of columns
- Display article count
- Number of articles to display in archive
- Display subcategories
- Subcategory depth
- Display subcategory articles
- Hide empty categories
Article Settings
Display options for the articles, including
- Enable comments
- Display article usefulness
- Display article views
- Display comment count
- Display related articles
Search Settings
Options for live search functionality, including
- Enable live search
- Focus live search on page load
- Search placeholder text
- Display search result excerpt
Slugs
Set slugs for the knowledge base, including
- Articles slug
- Article Categories slug
- Article Tags slug
Custom Style
Text entry for small style snippets to the knowledge base (or sitewide), note it recommend to use a customized child theme for modifications.
Article Feedback Settings
- Article Feedback
- Options for article feedback, including
- Enable feedback
- Enable anonymous feedback
- Collect upvote feedback
- Collect downvote feedback
Transfers Settings
Options for capturing transfers/visits to external help or ticketing systems, including
- Default transfer URL
- Load transfer links in new window
4. Setting up bbPress forums
This theme supports bbPress, a popular forum plugin for WordPress. With bbPress you can add forums to your Hero Theme powered site.
When the theme is installed and activated, you may see a notification advising you that bbPress is recommended plugin and prompting to install bbPress. If this does not appear, or you want to install bbPress later search bbPress from Plugins > Add New > Search.
Install and activate bbPress. Once installed, you will be greeted by bbPress the welcome screen and have three new menus in your administration panel menu – Forums, Topics and Replies. The theme will also display a link to the forum from the front page of your site if you have the front page set up as described below.
Create your first categories and forums by selecting Forums > New Forum, or install the HelpGuru demo content as described below. You and your users can create categories, forums, topics, make replies and build a community to complement your Hero Themes powered site.
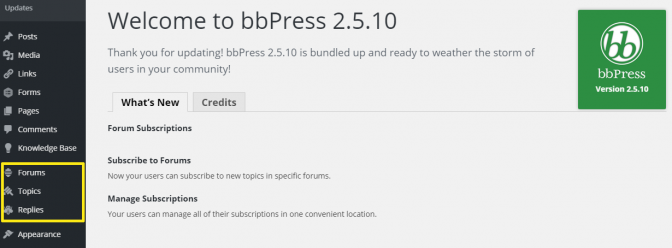
For additional help and support around the general use of bbPress, consult the bbPress website.
5.1. Home Page and Blog Setup
To setup the homepage page and blog page. Simply go to Pages > Add New and create the following pages with no content:
- Blog
- Home
For the Home page, be sure to select the custom Homepage template from the Page Attributes metabox to ensure it uses the correct page layout.

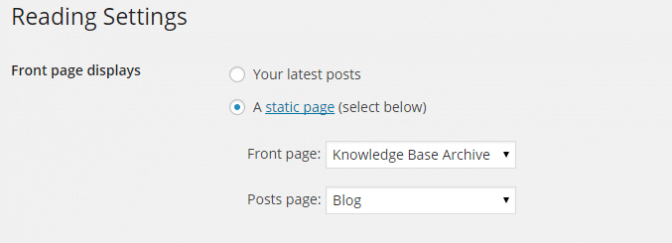
Next we need to assign these pages in WordPress as our homepage and blog page. Go to Settings > Reading and set the settings like this:

5.2. Using the Knowledge Base as your Homepage
Alternatively, to use the Knowledge Base as the homepage, set Front page to Knowledge Base Archive in Settings > Reading.
6. Import the Demo content
Contained in the HelpGuru theme package is the helpguru.wordpress.demo.xml file, which can be used to replicate the content from the HelpGuru demo site.
Note that some manual configuration of widgets and menus is still required and due to licensing restrictions, no images are included.
This is an optional step and only required if you are initially replicating the look of the HelpGuru demo.
To begin installing the demo content, goto Tools > Import and select WordPress from the list. If not installed, the WordPress Importer will be installed.
To import the demo content, select the helpguru.wordpress.demo.xml, found in the HelpGuru theme package. Click Upload and Import. On the next screen, you can change the authors if you wish, otherwise click Submit to complete the import process.

7. Configure the Navigation Menu
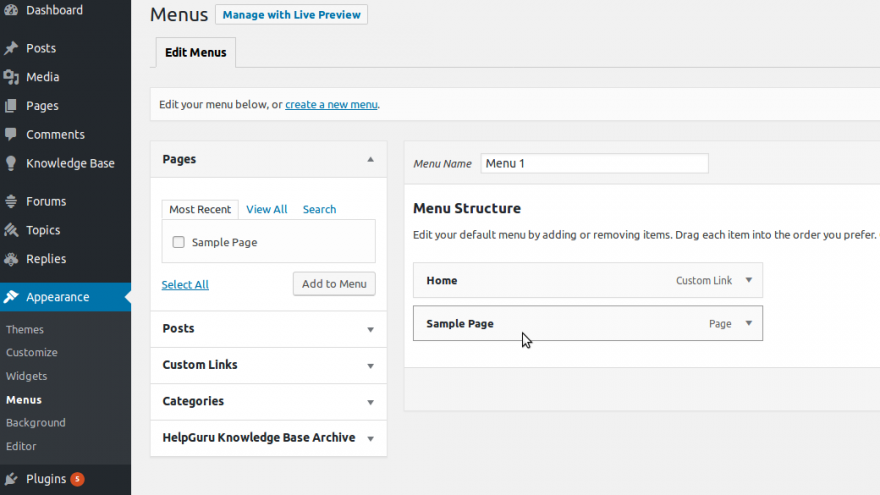
To setup your custom menus, navigate to Appearance > Menus. Give your menu a name and click Create Menu.
With the new menu you can add a variety of items including pages, categories, custom links. To extend the available items, you many need to select the Screen Options tab at the very top of the screen and configure the visible items.
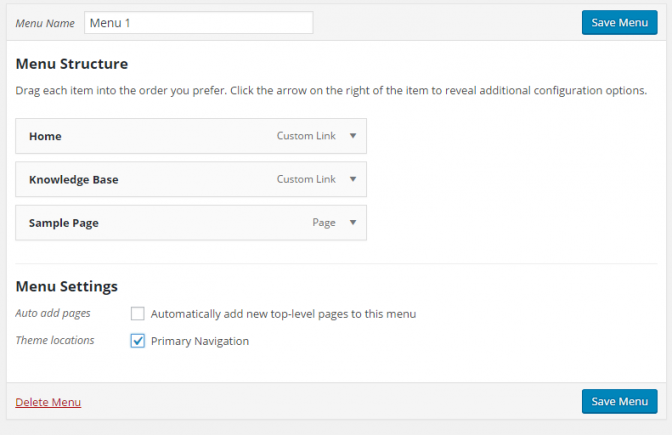
Once you have built and saved your menu, select Primary Navigation in the Menu Settings section to assign the menu to the navigation area of the theme.
8. Configure the Widgets
This theme features several Widgetized areas, which allow you to drag ‘n’ drop WordPress widgets which can be accessed from Appearance > Widgets.
The widgetized areas include: the default sidebar, BBPress Sidebar (if active), Knowledge Base Sidebar, Footer Widgets and Homepage Widgets. To use a widget in one of these areas, drag it from the Available Widgets panel on the left into one of the boxed areas on the right. Various options can then be set, including the title of the widget and what content appears.
Widget availability may depend on what plugins are installed and activated.
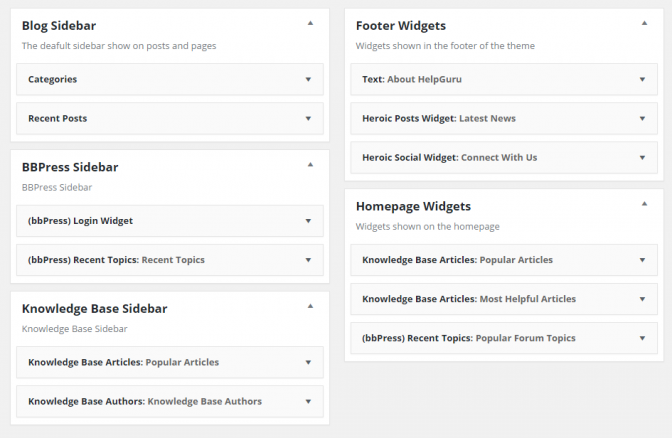
If you wish to use the Posts Widget and Social Widget, shown in the screenshot above. You’ll need to install the Posts Widget and Social Widget plugins by HeroThemes, available for free from the HeroThemes GitHub page. The plugin zip files can then be installed from Plugins > Add New > Upload Plugin.
9. Using your new theme
With the initial setup done, you can add/edit content. Change colors and layout (see the customizer options in the section below), and craft your help center.

Configuration Options
Customizer Settings
You can customize various visual aspects of the theme using the WordPress Live Customizer. Go to Appearance > Customize. Take some time to take a look through the options and customize them for your site.
Header Options
- Site Title – The title for your site
- Tagline – A tagline for your site
- Site Logo – Add a custom logo, recommended size is 200px wide and 55px tall.
Footer Options
- Site Copyright – Enter your site copyright message
Styling Options
- Link Color (Hover) – Select using this color picker
- Link Color – Select using this color picker
- Header BG Color – Select the header background color using this color picker
- Header Font Color – Select the header font color using this color picker
- Page Header BG Color – Select the banner background color using this color picker
- Page Header Font Color – Select the banner font color using this color picker
Header / bbPress / Blog / Knowledge Base Options
- Headline – The headline that appears in the top banner on this page
- Tagline – A tagline for beneath the tagline on this page
- Sidebar Position – Set the position of the sidebar in these sections (None, Left or Right)
Navigation Options
- Primary Navigation – select the menu you want to use for the main navigation, these can be created or edited from Appearance > Menus.
Widgets (bbPress Sidebar, Knowledge Base and Footer Widgets)
- Widgets Shown – add/edit widgets from the live customizer. These can also be controlled from Appearance > Widgets.
Getting the most out of your theme
Using Categories and Forums
When you set up the forums, it is important to consider the structure of the forums. Setup several categories with sub-forums to ensure it looks aesthetically pleasing.
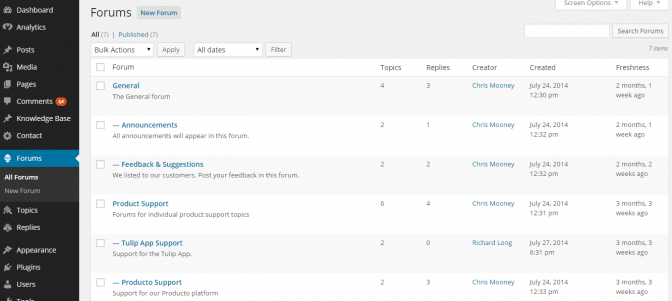
First you need to create several forum Category types, eg General, Product Support, Other. Into these you should put your Forum types, eg Announcements, Feedback and Suggestions, My App Support, Their App Support, etc. These are the sections where users can start individual topics/threads.
Categories and Forums are created in a similar way by selecting Forums > New Forum. The forum type is then set on the right under Forum Attributes. Set the parent Category Types under the Type drop-down option. For forums, select Forum as the Type and the Parent as the parent category you wish the forum to appear.


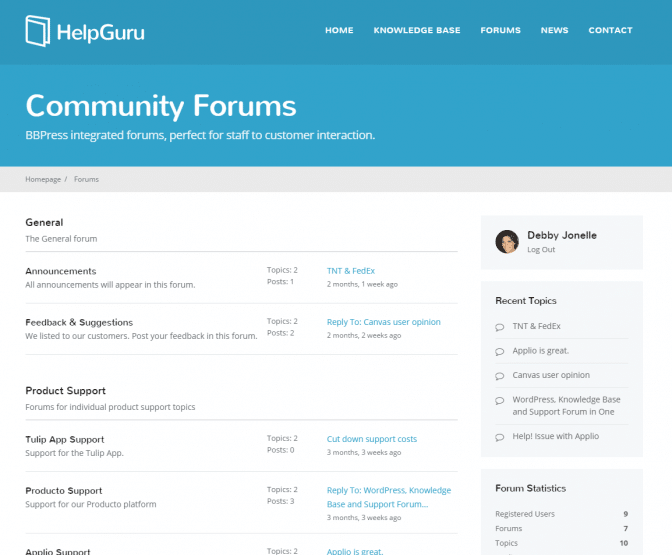
The bbPress forums on the HelpGuru demo forums site are configured with two parent Categories – General and Product Support. In each of these there are several Forums – Announcements, Feedback and Suggestions, Tulip App Support, Producto Support, Applio Support.
This results in a structured appearance in the community forums section of the site.
Featured Images
The theme supports the use of featured images. The theme supports auto-resizing of the featured images. Auto-resizing will only occur however when the image is uploaded for the first time, images that have previously been uploaded will not be resized. You can however use the Regenerate Thumbnails plugin to regenerate the thumbnails to fix this.
To upload a post thumbnail, go to Posts > Add New or open an existing post in editing mode. Locate the Featured Image module and click the Set featured image link.
Clicking the link will open up the WordPress image uploader where you will upload your image. Simply make sure that it is either the same size or larger than what the final thumbnail will be. Once you’re done uploading the image, simply click the link that says “Set Featured Image”, which is next to the button to insert it into the post.
For more on how to use the WordPress’ Post Thumbnail feature, please see this article from WordPress on featured image support.
Homepage Menu Blocks
HelpGuru’s homepage varies depending on whether the forum is active, it does not display a forum link if bbPress is not installed/activated.
To change the blocks you will need to customize the Homepage template, please refer to our guide on customizing your theme.
Live Search Results
Search results are powered by WordPress search engine. Note that the live search results are affected by various options including those from the Search settings tab of Knowledge Base > Settings and the general WordPress configuration in Settings > Reading.